What is process mapping and why does it matter? Learn from this business owner as she walks through how to create a process map.

Occasionally, business is tough. There have been moments at Abigail Gingerale Photography when we didn’t book a single job for almost three weeks. These “dry spells” come and go, just like weeks when we book several gigs a week.
Often times these ups and downs come in moments when we’re working on improving our clientflow. We had been making changes to our workflow, trying to make our customer experience the best it could be.
When we’re working on optimizing our clientflow, we create a process map for our entire booking process. A process map is helpful whether you’re using one for the first time, or just reassessing your old one for improvements.
Process maps help us zoom out and look at our workflows from start to finish to really understand what is breaking down or missing. Once we have everything mapped out visually, we could then translate it into business process automation software.
Our experiences with process mapping have led to serious process improvement, and I know it can do the same for you. Whether you’re just creating your business processes or looking to improve existing ones, here’s how to create a process map for your entire business.
Jump to:
- What is a process map?
- Getting started with business process maps
- Use a process map template (download free)
- Assessing your process map
- Setting up business process automation
- Use process maps for overall business improvement
What is a process map?
A process map breaks down everything in your workflow and defines who is responsible for each part of the process. It also details what happens at each step. The main purpose of a process map is to view everything at once and determine how to make it more effective.
Process mapping has four levels of detail, and you can choose to build upon each one, or just dive into creating the type of process map that aligns with the level that you need:
- Level one: A simple list of your process steps to get a broad overview.
- Level two: Visual representation of how your process flows from start to finish, including decision points.
- Level three: Depicts the workflow as well as the team members involved with each step.
- Level four: This is the most detailed process map. Your steps and stakeholders are visually represented along with instructions for completing each step.
To make this easy, the process map template provided in this article can help you.
When we started optimizing our clientflow, we decided to use a full level four process map to really understand everything from start to finish.
So what happens when a client first lands on our site? What happens when they inquire? What are they seeing on their end? Is it what we want them to see? How do we know? Well, we didn’t, and that was a huge problem. We needed to break it all down.
Get started creating a process map
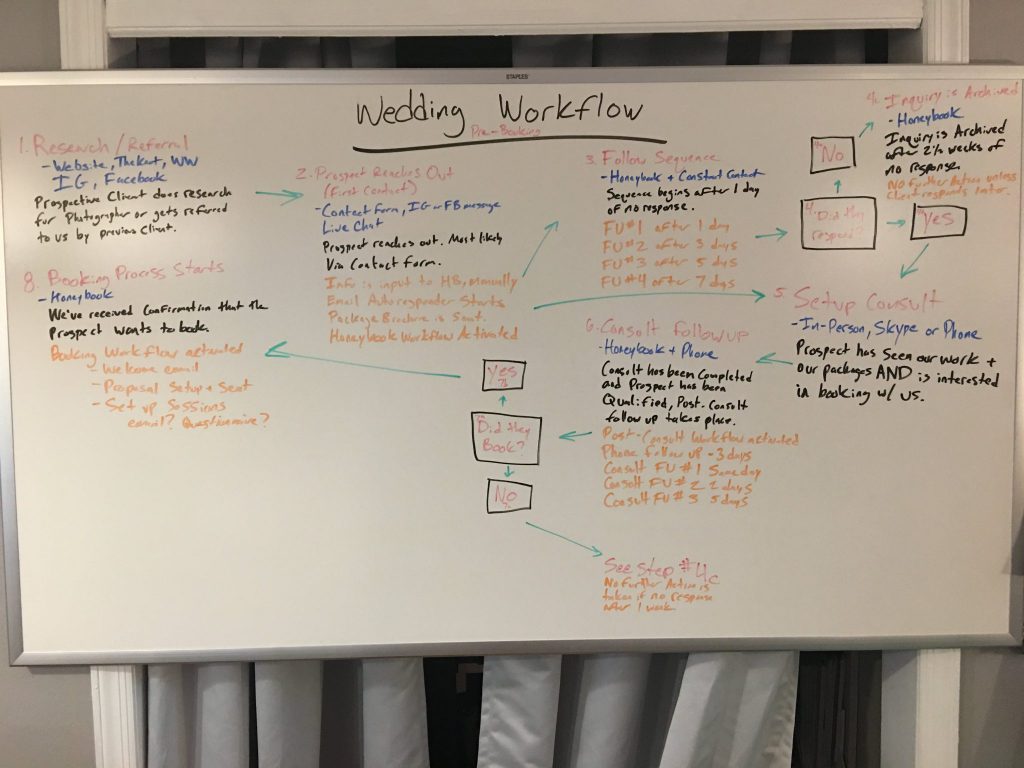
For my company, it was best to start with a big brain dump with everyone involved in the processes. I took out our whiteboard and started at the beginning. Specifically, we were looking at our pre-booking process for wedding clients. For your business, you could do the same for any of your processes.
We wrote down each process step, what was required to make it happen, and what it means for each step to be complete. As we were writing everything down, we were able to identify the exact drop-off point where prospective clients weren’t moving forward with booking. It was something so small, but it explained exactly why our prospects weren’t getting back to us.
To get started, I recommend doing the same. Identify a process where you’re not seeing the results you desire. Then, write out the steps you’re currently taking and build on the levels from there. You can use process mapping symbols to keep track of things like software, priority, team responsibility, business versus client responsibility, subtasks, decisions required, and review points required.
If you’re not sure where to start, ask yourself some key questions first, like:
- How do most of my clients find me?
- How do they select services?
- How do they book a project?
Use these answers to determine where your leads become likely to convert and move forward from there.
Use a process map template to create a process map
Perhaps you don’t have solid processes yet and you’re just brainstorming. If that’s the case, use this process map template to answer the questions that will help guide you in how your process can flow from end to end.
HoneyBook offers a great process template that includes questions about every step and an example that shows how everything can move together seamlessly. Check it out below. ↓

Map your process to create a frictionless clientflow. Then, automate your business processes to save time and build your revenue.

Assessing your process map
Once you have your process map (in any form), it’s time to assess it. Your experience may not be just like ours where we were able to identify gaps immediately. Instead, there may be steps you can optimize that you don’t even realize.
As you look at your documentation, consider:
- Could your clients go through fewer steps? Can you eliminate any points of contact by combining them?
- Could your team go through fewer steps? Can you eliminate any points of contact using automations?
- Are there any steps you can combine?
- Are you offering clients enough information at the right steps?
- Are leads or clients dropping off at certain steps?
Ideally, your process map should help make your clientflow as friction-free as possible. The order might be different, but you want to make sure you’re evaluating steps that fit into:
- Capture new business
- Marketing
- Discovery
- Qualify leads
- Mutual qualification
- Initial contact
- Book clients
- Service offering and selection
- Contract signing
- Manage projects
- Project execution
- Service delivery
- Maintain relationships
- Project closure
- Ask for a review or referral
- Renewal, when applicable
Setting up business process automation
Once you map your process and get it to the place you want, it’s time to automate it! You don’t need to use business process automation for everything, but taking repetitive tasks off your plate will lead to time savings. Even more, it’ll make your client experience better since you can spend more time on personalized interactions and less time on administrative work.
We use HoneyBook for our clientflow management software. It allows you to create contact forms that sync with automations so your email communications to leads can be fully hands-off. Once someone starts a project, you can also automate the onboarding process, parts of your project management, and your project closure.
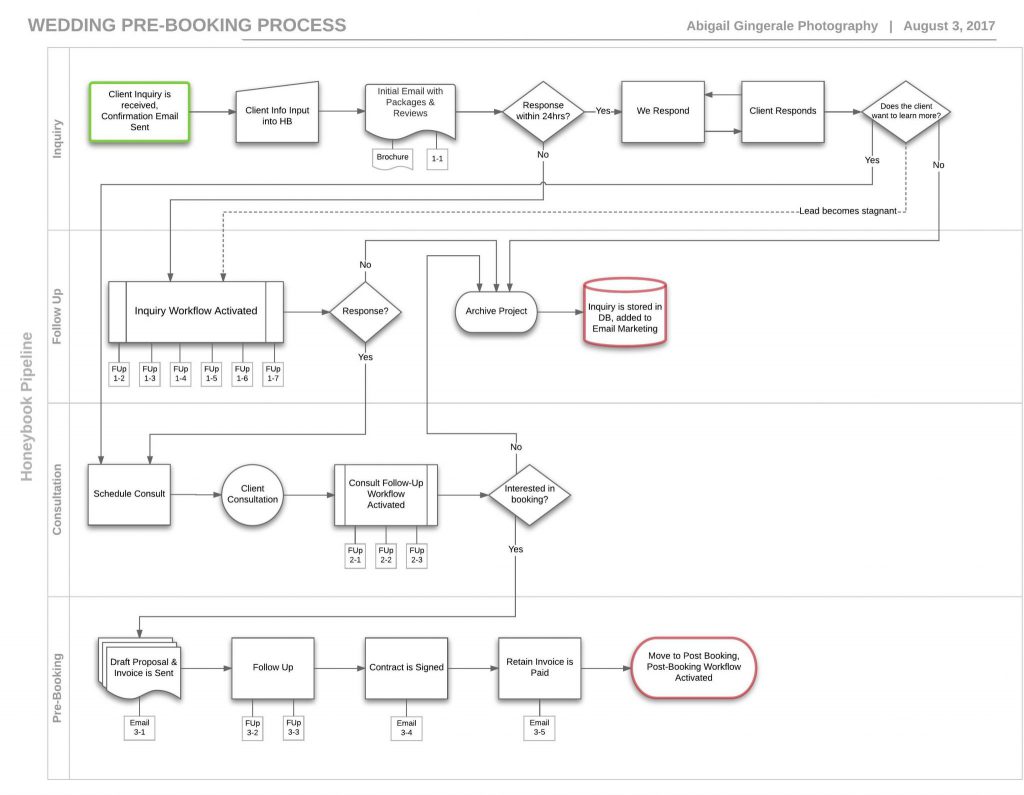
One of the things we automate is our level three pre-booking process map.

In this process, the inquiry comes in and the info goes out into HoneyBook automatically. Then, I send them an email template “1-1” and my brochure for wedding photography.
If they respond, I’ll talk to them and set up an in-person consultation with them in my studio. But what happens if they don’t respond?
Each stage in my process map corresponds with my HoneyBook Pipeline.

Here’s where the fun begins. The follow-up stage:

As soon as I send that initial email (email 1-1 and my brochure), I activate my “Inquiry Follow-up Workflow” from within Honeybook. Each one of those email templates links to full wedding galleries, and blog posts (such as “Developing Your Wedding Day Timeline for Amazing Wedding Photos”) educating my clients on why they should book with us.

One day after sending my initial email 1-1, the client will get a follow-up email. Two days after that, they’ll get another follow-up email. After another three days, they’ll get a third follow-up email. See how awesome that is?! This saves me a lot of time when it comes to following up with clients. This is the cornerstone of my client work because it’s all through an automated business process. This workflow starts automatically and ends as soon as the client responds.
Once a client responds and wants to proceed, we enter the consultation stage. I have a workflow to send my “Thank You Email Template” and my two follow-ups. This workflow is manually triggered immediately after the consult.

After that, the last phase is booking. During this phase, we send our contract and invoice to the client.
Pro tip
You can send your contract, and invoice, and collect payment all in one email with HoneyBook smart files.

To sum everything up, in my “Pre-Booking Process Map,” I have 15 email templates, one brochure, and two agreement templates in place.
Once we activated this process, we saw our conversion rates jump up to almost triple what they were before. Repeat: My email response rates more than tripled. The whole point of seamless communication is to make sure our clients feel like we have thought about everything and we have it all covered.

Use process maps for overall business improvement
Process maps are a valuable tool for overall business improvement. You can use them before you even have processes in place to iterate how you may want your flow to look. You can also use them to analyze gaps and improve performance, and better utilize business systems like HoneyBook!
Try mapping your process at least once a year to continually improve your clientflow.
Automate your processes with HoneyBook
Set up business process automation that you can have full control over.


