

Quick Tips to Tidy Up Your HoneyBook Account in Less Than 5 Minutes
Start a Trial
It’s time for some spring cleaning! Follow these quick and easy steps to tidy up six areas of your HoneyBook account.
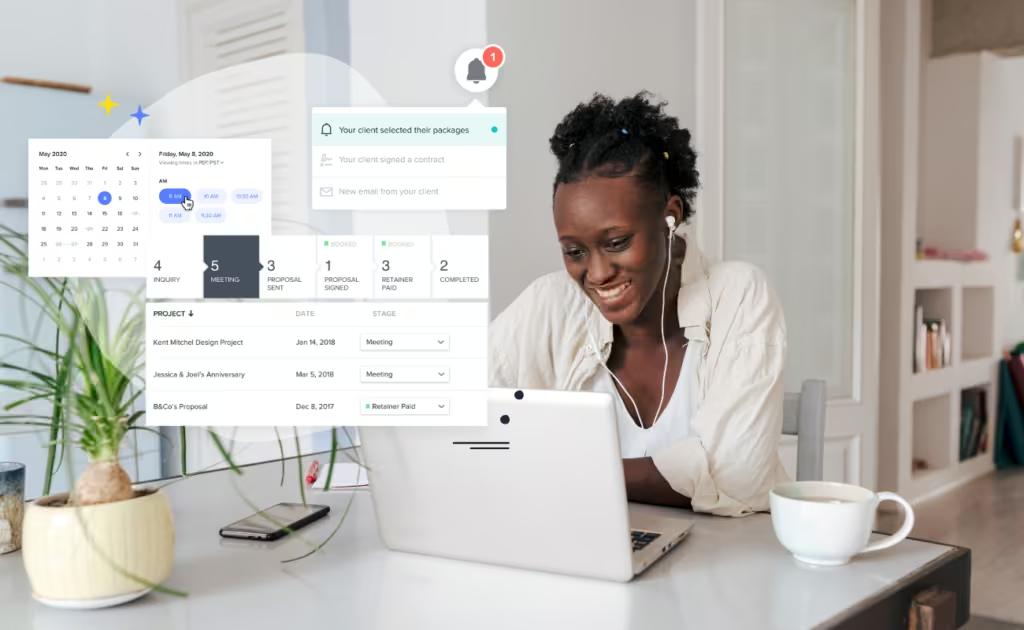
Happy Spring from all of us at HoneyBook! We want to support you this season with some easy (read: quick) steps for tidying up your HoneyBook account so you can hit the ground running.
Last year threw us all quite a few curve balls so it’s probably safe to say getting organized wasn’t exactly at the top of your priority list. That’s why we think now is the time to carve out five minutes a day, over the next few days, to simplify a couple areas of your account that could use a little extra TLC.
We’ll go over best practices that you can use from now on to maintain a neat workspace, some tips and tricks you might not know about, and some general housekeeping reminders.
If you’re feeling extra ambitious you can start the clock for 1 hour right now and you’ll have a clean slate to work from by the time you get to the bottom of this page. Ready, set, happy spring cleaning!
How to Clean Out Your Pipeline
If your HoneyBook pipeline is giving you anxiety or just isn’t the most accurate version of what you’re actively working on right now, it might be time to clean things up a little bit.
As a best practice, you might want to consider doing these steps once a month or even once a week depending on how many inquiries you typically have, that way things won’t pile up. Here are some quick steps to clean out your HoneyBook pipeline in under five minutes.
- Start by clicking into the Projects tab to get a look at your pipeline.
- Now click into your inquiry stage and filter by Recent Activity.
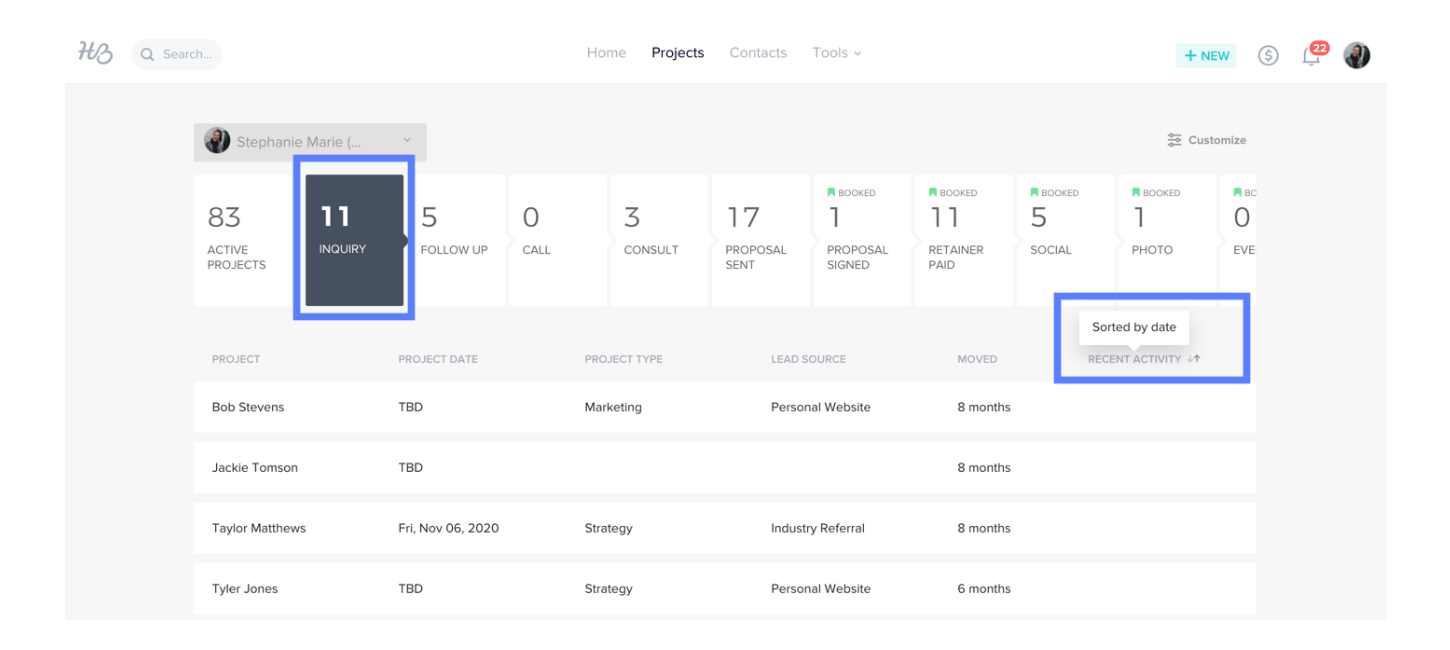
To bulk select in your HoneyBook account, simply hover over a project and check the box that appears to the left. From there you can select all and just unselect the few that don’t need to be moved or archived.
You’ll notice there is a list of reasons for archiving that you can choose from, so to take extra care in your effort to get more organized, you might consider bulk archiving in separate batches based on their reason.
Repeat these steps across each stage in your pipeline until you’re only tracking the jobs that you’re actively working on and voila!, your HoneyBook pipeline is just like new.
Pro tip: deleting a project should only be used as a last resort! Archiving allows you to clean things up without completely removing a project from your HoneyBook account forever.
How to Clean Up Your Templates
If you have to scroll a mile to find the template you’re looking for anytime you need to email, bill or send a contract to a client, you might want to consider cleaning up your master templates section. Here are some quick steps you can take to clean up your HoneyBook Templates in under five minutes.
- To get to the templates section in your HoneyBook account, click Tools and then Templates.
- We recommend starting with emails, but you can start wherever makes the most sense to you!
- To make things easier, switch from the grid view to the list view. tThen filter for Date Created (oldest).

- Now, to get rid of any old templates, you simply hover over them and hit the trash can icon.
- While you’re here, consider clicking into any templates you don’t recognize and check to make sure they’re relevant and aligned with your brand.
- The final piece is to make sure ALL your templates are appropriately named so when you go to use them later, you recognize them by their title alone.
Pro tip: accurately naming your files and templates is really important to ensure you can easily navigate to the proper content later on in the middle of rapid-fire conversations with your clients!
How to Streamline Your Meetings
Are you still playing email ping-pong with clients to find time to meet? Do your clients wait days to get a glimpse of your schedule?
Consider taking the next five minutes to set up the HoneyBook Scheduling feature in your account and put your scheduling woes to rest once and for all.
- Navigate to Tools and then click Scheduling.
- Get started by clicking + New Session Type and define what kind of session you want to set up (video, phone call, in person, etc.). Then give the session a simple title so that your clients clearly understand what the meeting is about. Try something like “30 min consult” or “1-hour process assessment”.
- Be sure the Duration of your session reflects how long you’d like the meeting to be and include any instructions that you’d like the client to receive via email. You can try something like “Come prepared with any questions you have and at least two goals you’d like to accomplish together over the next few weeks” or “don’t forget to review my helpful style guide document before our session!”
- Now you’ll adjust your Availability to align with the times you’re available for this kind of meeting by hovering over the time slots on any given day. Don’t worry about considering other events on your calendar when you set your availability, HoneyBook will automatically take your calendar into consideration when displaying available time slots to your clients. Most people will simply use this area to showcase business hours. Something like “9am-12pm” and “1pm-5pm” will work just fine!
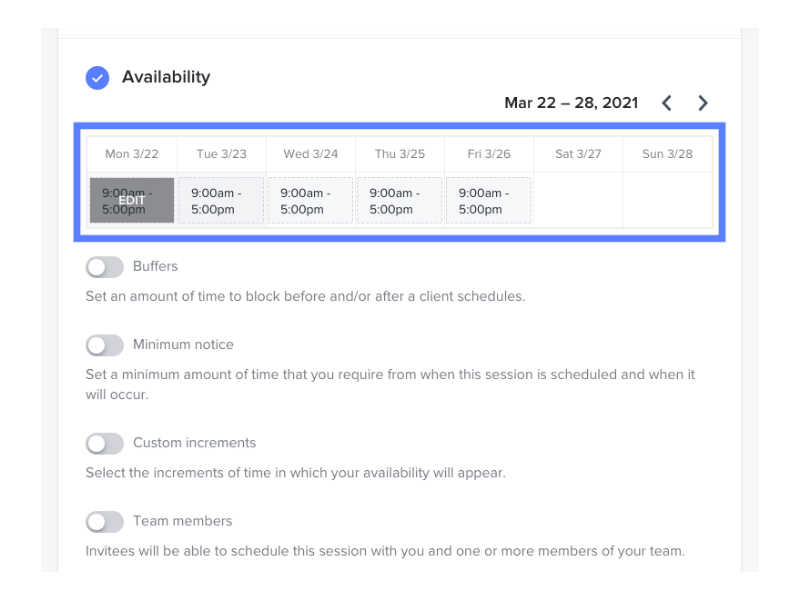
- Set any Buffers that you’d like to have in between meetings and how short notice a client can book (ie. can they book a meeting to start in an hour from now or would you prefer more time to prepare?).
- Customize your Confirmations and hit Save!
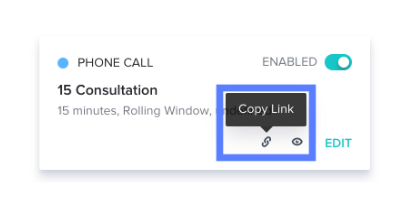
- Now you have a designated online meeting scheduler link you can easily share from within your activity feed, on your website or practically anywhere you can copy and paste.
How to Clean Up Notifications in Your HoneyBook Account
Do you ever feel like you’re getting more HoneyBook notifications than you need? You can actually control what we notify you about so we’ll only reach out with what’s most important to you!
Let’s review 3 easy steps to consolidate your HoneyBook notifications!
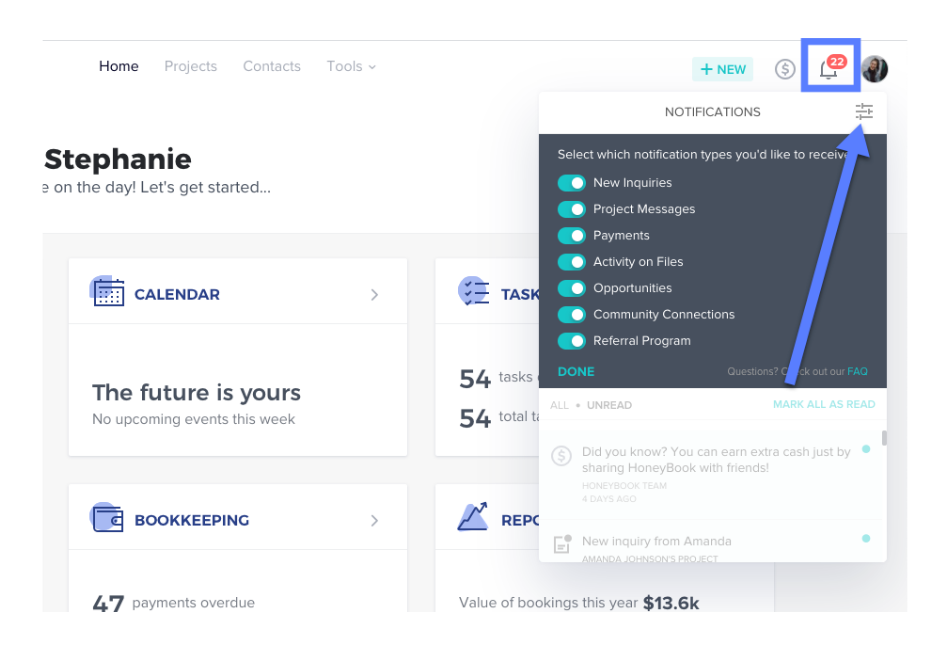
- The first place to check is the Bell Icon on any page in your HoneyBook account. Click here and then click the toggle icon to bring up your notification preferences. You’ll probably want to leave the top four turned on, but the bottom three aren’t as crucial.
- Next step is your preferences tab. Hover over your profile picture, click Company Settings, then navigate to the Preferences section and scroll down to Notifications. Here you can toggle off any unnecessary emails and product notifications.
- The final step is the mobile app. There are two places you can control mobile app notifications. The first is from the Notification Center on your phone and the second is from within the HoneyBook app itself. From inside the app you can turn notifications off entirely by clicking Settings and toggling notifications off. From your phone’s Notification Center, you can control how the notifications appear (banner, badge, etc.) or if they appear at all.
How to Clean Up Your Settings
There are a couple features in your settings that you can customize to make your life easier and more organized. You might be aware of them already, but let’s take the next five minutes to double check that make sure you’ve got everything set up the way you need it to be.
- Navigate to Company Settings via your profile picture in the top right corner of your HoneyBook account. Then select Preferences from the left-hand tab.
- Here you can customize your Lead Sources, Project Types, and Project Details. Each of these are essentially smart fields that can pull the information your clients enters into your Contact Form. This includes the project details as well as payment schedules, contracts, and more. Customizing these and adding them to your Contact Form can save you a lot of time. It also ensures your HoneyBook account accurately reflects what it is you do, who your clients are, and how you like to work with them.
Putting in a little work now to set your settings up correctly will make it easier to understand where your leads are coming from later in the Leads Report or even just sending a contract to a new client.
For example, if you find yourself adding notes into every single project about a specific job detail, you might want to consider adding a custom Project Detail field for it instead.
Or if you’ve shifted gears a bit since the first time you created your Project Types, maybe it’s time to get rid of some service categories you no longer offer. Simply click the Edit button to clean things up.
- You might also want to consider adjusting the Payment Reminders towards the bottom of the Preferences page. Payment reminders can save you a ton of time and ensure you get paid on-time, every time!
How to Clean Up Your Booking Process
Are you still sending online contracts and online invoices separately? The HoneyBook proposal software COMBINES your invoice and contract into one powerful booking file.
This helps you save time and get your client’s what they need, all in one place. You can even send at Proposal right from your phone! Did we mention the contract will even populate with the job specifics, customized services and payment schedule details? Yeah, it’s that smart!
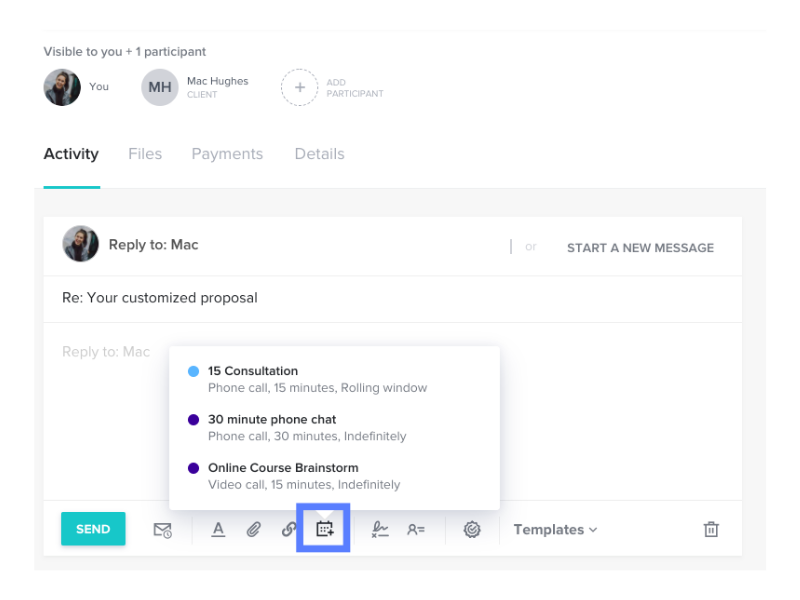
- From inside any project click the New File button and select Proposal.
- Start from a blank proposal. Once you’re inside the file you can start customizing the services and pricing this particular client is going to receive from you. Click + Add New Item to open your drawer of Package templates. You can hover over any item to delete it via the trash can icon or click your cursor anywhere in the text or pricing to personalize even further.
- Customize the payment schedule amounts and due dates to fit your business needs and that needs of your client.
- Finally, make sure the online contract looks good to go. You can choose a different contract from your Contract Templates drop down menu.

- Once that’s settled you simply hit NEXT: Review Email and send it over to your client.
Feeling skeptical? You can hit the Client View button at any point to get a a preview of what your client will receive.
Whether you’re just getting started with your HoneyBook account or are a long-time member, we hope these tips and best practices will help you create (and maintain) a tidy workspace no matter what comes your way!

Mac Hughes is a business management software pro and notorious fashionista among friends and coworkers alike. She has worked alongside the tech geniuses at MINDBODY and HoneyBook helping business owners adopt processes for streamlining their passions. When she’s not busy helping service based businesses reach peak efficiency, you can probably find her crafting some home brew in the garage.