

Step-by-step guide to setting up a gmail email signature
Start a Trial

Learn how to add a signature in Gmail and make it visually appealing, actionable, and professional.
Personalize your Gmail mobile app email signature
Enhance your email communication by adding a personalized signature that will appear at the end of every message you send from the Gmail mobile app. Follow these simple steps to add a signature in the Gmail app:
Step 1: Launch the Gmail application on your mobile device.
Step 2: Locate the Menu icon, typically represented by three horizontal lines, in the top-left corner of the screen, and tap on it.
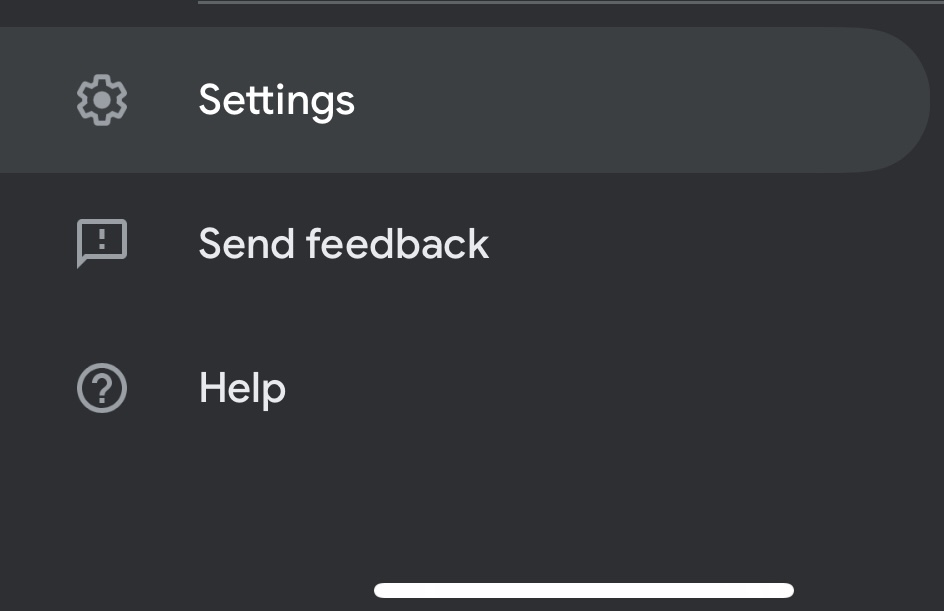
Step 3: Scroll down the menu options until you reach the bottom, and select the “Settings” option.
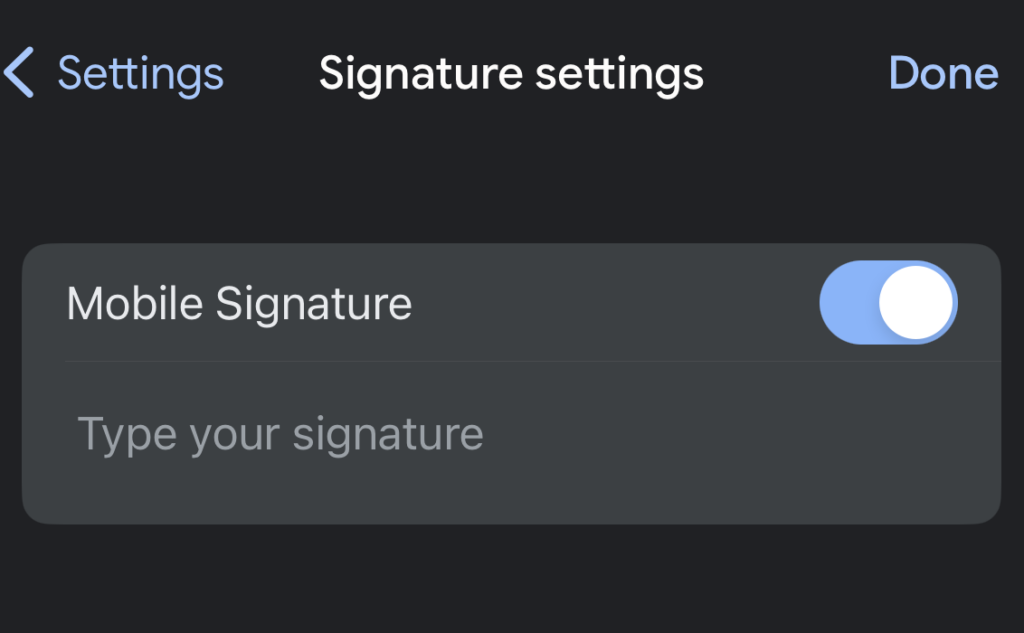
Step 4: Choose the Google Account for which you wish to create a signature.
Step 5: Tap on the “Mobile Signature” option.
Step 6: In the provided text field, enter the desired content for your signature. This could include your name, contact information, or any other relevant details you wish to share.
Step 7: Once you have entered the signature text, tap “OK” to save your changes.
From now on, every email you send from the Gmail app will be accompanied by your unique signature, adding a personal touch and making it easier for recipients to identify and contact you.
Craft your Gmail email signature on your computer
Enhance your email communication by adding a personalized signature that will appear at the end of every message you send from Gmail on your computer. Follow these straightforward steps:
Step 1: Launch your preferred web browser and log in to Gmail.
Step 2: In the top-right corner of the Gmail, locate the “Settings” icon (represented by a gear symbol) and click on it, then select “See all settings.”
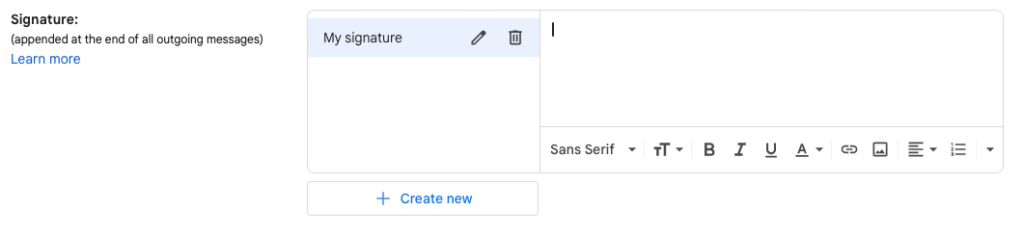
Step 3: Scroll down to the “Signature” section, where you will find a text box. This is where you can craft your unique signature.
Step 4: Type in the desired content for your signature, which could include your name, job title, contact information, or any other relevant details you wish to share.
Step 5: Once you have completed crafting your signature, scroll to the bottom of the page and click the “Save Changes” button to apply your new signature settings.
Each email you send through Gmail on your computer will now include your personalized signature, giving your messages a professional appearance and helping recipients easily recognize and contact you.
Have you ever wondered how your industry peers make their Gmail signature look so good? You know the ones that have a pretty headshot or a logo mark along with important information like their title, website, and contact information, plus some social media buttons?
Many find using an email signature generator or a signature editor to be helpful. However, if you’ve tried and failed to figure out how to add a signature in Gmail and make your emails go from drab to oozing with professional style, I have got your back! A custom email signature is easier to achieve than you might think. Follow these step-by-step instructions to achieve this for your own Gmail signature. I promise you it is easy to do!
Why Gmail, you ask? Well, Gmail remains one of the top email clients around, trailing only behind Apple iPhone in tracked opens based on a study done on 2023 email market share by Litmus. I also know that many small business owners tap into Google’s G Suite to manage their inbox and other heavily used Google-based internet apps, so by popular demand, Gmail it is!

Pro tip: A clientflow management platform like HoneyBook can help you stay organized and look professional. at every step. That includes creating professional and on-brand email signatures for every client email.
How to add a signature to Gmail app: Step-by-step
Step 1: Open the Gmail App
- Launch the Gmail app on your mobile device. Make sure you are signed into the account you want to add a signature to.
Step 2: Access settings
- Tap the three horizontal lines in the top left corner to open the menu.
- Scroll down and select “Settings.”
Step 3: Select your account
- Tap on the email account for which you want to set up a signature. This will open the settings for that specific account.
Step 4: Go to signature settings
- Scroll down to find the “Mobile Signature” option and tap on it.

Step 5: Enter your signature
- Type in the text you want to use as your professional email signature. This can include your name, job title, contact information, or any other relevant details.
Step 6: Save your signature
- Once you have entered your desired signature, tap “OK” or “Save” to apply the changes.
Step 7: Test your signature
- Compose a new email to see if your signature appears at the bottom. If it doesn’t, go back to the settings to ensure everything is correctly configured.
Additional tips:
- Keep it simple: Mobile signatures should be concise due to limited screen space.
- Consistency: Ensure your mobile signature aligns with your desktop email signature for consistency.
- Professional appearance: Use proper formatting to maintain a professional appearance.
How to add a signature to Gmail on a desktop: Step-by-step
Step 1: Open Gmail and sign in
- Launch your web browser and go to Gmail.
- Sign in to the account you want to add a signature to.
Step 2: Access Gmail settings
- In the top right corner, click on the gear icon (Settings).
- Select “See all settings” from the dropdown menu.

Step 3: Navigate to the signature section
- In the settings menu, click on the “General” tab.
- Scroll down until you find the “Signature” section.
Step 4: Create your signature
- Click on the “+ Create new” button.
- Enter a name for your signature (this is useful if you want multiple signatures).
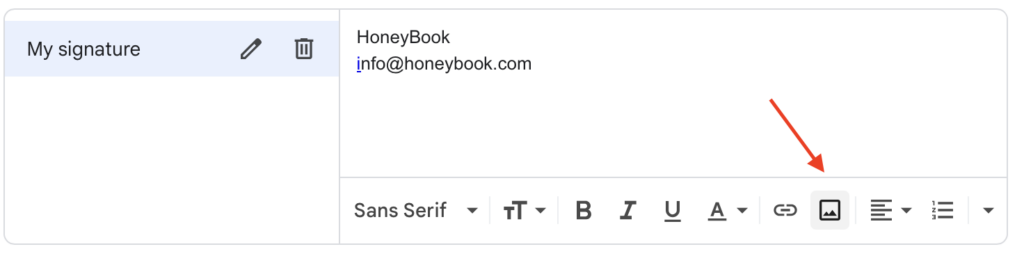
- In the text box that appears, type your desired signature. You can include your name, job title, contact information, and any other relevant details.
- Use the formatting options to style your signature (e.g., bold, italics, add links, images).

To make a professional email signature quickly, check out the HoneyBook email signature generator. Just input your logo, information, and more, generate your signature, then copy and paste it into your Gmail account!
Step 5: Set default signature
- Below the signature text box, there are options to set the default signature for new emails and replies/forwards. Select your newly created signature from the dropdown menus.
Step 6: Save changes
- Scroll to the bottom of the settings page and click “Save Changes.”
Step 7: Test your signature
- Compose a new email to see if your signature appears at the bottom. If it doesn’t, go back to the settings to ensure everything is correctly configured.
Additional tips:
- Professional appearance: Ensure your signature maintains a professional look with appropriate formatting.
- Consistency: If you use multiple devices, ensure your signature is consistent across all platforms.
- Update regularly: Keep your signature updated with current information and branding.
How to insert images and logos: Step-by-step
Step 1: Prepare your image
- Ensure your image is properly formatted and sized before uploading. JPEG, PNG, or GIF formats are commonly used. Aim for a size that is visible but not too large (e.g., 100×100 pixels for a logo).
Step 2: Access Gmail settings
- Open Gmail and sign in to your account.
- Click on the gear icon in the top right corner and select “See all settings.”
Step 3: Navigate to the signature section
- In the “General” tab, scroll down to the “Signature” section.
Step 4: Edit or create a signature
- Select an existing signature or click “+ Create new” to make a new one.
Step 5: Insert image
- In the signature editor, place your cursor where you want the image to appear.
- Click on the “Insert Image” icon (a small picture icon in the toolbar).
- Upload the image from your computer or provide a URL if the image is hosted online.
Step 6: Adjust image size and position
- Click on the image within the signature editor to adjust its size (small, medium, large, or original size).
- Drag the image to reposition it if necessary.
Step 7: Save changes
- Scroll to the bottom of the settings page and click “Save Changes.”
Step 8: Test your signature
- Compose a new email to ensure the image appears correctly in your signature.
Tips for ensuring images display correctly
- Use web-safe formats: JPEG, PNG, and GIF formats are widely supported and display consistently across different email clients.
- Optimize image size: Ensure the image file size is not too large to avoid slow loading times. Aim for images under 100KB.
- Host images externally: If possible, host your images on a reliable external server and link to them in your signature. This ensures they display correctly even if the recipient’s email client blocks attachments.
- Add alt text: Add alternative text (alt text) to your images. This ensures that even if the image doesn’t load, recipients understand what the image represents.
- Avoid image-only signatures: Combine text with your image to ensure important information is always visible, even if images are blocked by the email client.
- Test across clients: Send test emails to different email clients (Gmail, Outlook, Apple Mail) to ensure your signature displays correctly everywhere.
- Consistent branding: Use the same logo and color scheme as your company’s branding to maintain consistency and professionalism.
By following these steps and tips, you can ensure that your Gmail signature images are correctly inserted and displays as intended, enhancing the professional look of your emails.
How to add an HTML signature to Gmail step-by-step
Step 1: Create your HTML signature
- Write your HTML code using a text editor like Notepad or a more advanced HTML editor.
- Ensure your code includes necessary elements like your name, job title, contact information, and any images or logos you want to include.
- Use inline CSS for styling to ensure compatibility with most email clients.
Step 2: Access Gmail settings
- Open Gmail and sign in to your account.
- Click on the gear icon in the top right corner and select “See all settings.”
Step 3: Navigate to the signature section
- In the “General” tab, scroll down to the “Signature” section.
Step 4: Create or edit a signature
- Select an existing signature or click “+ Create new” to make a new one.
Step 5: Insert HTML code
- Copy and paste your HTML code into the editor.
Step 6: Save changes
- Scroll to the bottom of the settings page and click “Save Changes.”
Step 7: Test your signature
- Compose a new email to ensure your HTML signature appears correctly.
Troubleshooting common issues with HTML signatures
Signature not displaying correctly
- Problem: Incorrect HTML formatting
- Solution: Ensure your HTML code is correctly formatted. Even a small error, like a missing closing tag, can cause the signature to render improperly. Use an HTML validator tool to check for errors.
- Example: Ensure all tags are properly opened and closed, e.g., <p>Your Text Here</p>.
Images not appearing
- Problem: Broken image links
- Solution: Host your images on a reliable server and use absolute URLs in your HTML code. Make sure the image URLs are correct and accessible.
- Example: <img src=”https://yourserver.com/path/to/image.jpg” alt=”Description”>
- Problem: Images blocked by email client
- Solution: Some email clients block images by default. Ensure your images are hosted on a secure (HTTPS) server to reduce the chance of being blocked. Encourage recipients to mark your emails as safe.
- Tip: Add alt text to your images so recipients can understand the content if images are blocked.
Styles Not Applied
- Problem: External CSS not supported
- Solution: Use inline CSS instead of external stylesheets or embedded CSS. Many email clients strip out these styles, causing your signature to lose its formatting.
- Example: <p style=”color: blue; font-size: 14px;”>Your Text Here</p>
Layout issues
- Problem: Complex HTML structure
- Solution: Simplify your HTML structure. Email clients vary in their support for HTML and CSS, and complex structures can lead to inconsistent rendering.
- Tip: Use simple tables for layout instead of complex div structures, as tables are more consistently supported across email clients.
Signature appears as an attachment
- Problem: Embedded images or incorrect HTML
- Solution: Ensure images are properly referenced and not embedded within the email. Check your HTML for any code that could be interpreted as an attachment.
- Example: Avoid using ‘cid:’ URLs for images, and prefer external hosting with absolute URLs.
Signature not showing on replies or forwards
- Problem: Settings configuration
- Solution: Verify that your signature settings in Gmail include replies and forwards. In Gmail settings, ensure the correct signature is selected for new emails as well as replies and forwards.
- Tip: Check the settings under “Signature defaults” in the Gmail settings menu.
Best practices for email signatures
Creating an effective email signature is more than just adding your name and contact details at the end of an email. A well-designed signature can enhance your professional image, reinforce your brand identity, and provide essential information in a concise, visually appealing format. By following best practices in design, including the right information, and avoiding common mistakes, you can ensure your email signature serves as a powerful tool for communication.
Email signature design tips
Keep it simple and professional
- Minimalism is key: Avoid cluttering your signature with too much information or overly complex designs. A clean, simple layout is more effective and professional.
- Readable fonts: Choose fonts that are easy to read and maintain a consistent size throughout the signature. Avoid using more than two different fonts.
- Appropriate colors: Use colors that align with your brand. Stick to a limited color palette to ensure the signature looks cohesive and professional.
Consistent branding with fonts and colors
- Brand alignment: Use the same fonts, colors, and style that are consistent with your company’s branding. This helps maintain a uniform brand image.
- Logo and icons: If including a logo or social media icons, ensure they are high quality and appropriately sized to match the text.
Information to include
Essential elements
- Name: Clearly display your full name.
- Job Title: Include your current job title to provide context to your role.
- Contact Details: Provide your phone number, email address, and any other relevant contact information.
- Social Media Links: Include icons with links to your professional social media profiles (e.g., LinkedIn, Twitter).
- Company Information: Add your company’s name, website, and physical address if applicable.
Common mistakes to avoid
Overloading with information
- Too much text: Avoid adding excessive text or unnecessary information. Stick to the essentials to keep the signature concise and readable.
- Irrelevant details: Do not include personal information or unrelated details that could detract from the professional nature of your signature.
Using too many images or large files
- Excessive images: Limit the number of images to avoid clutter. A logo and a few social media icons are usually sufficient.
- Large file sizes: Ensure that images are optimized for web use to avoid slow loading times. Large image files can cause emails to be flagged as spam and may not display properly on all devices.
Adding a signature to your Gmail is a straightforward process that involves accessing Gmail settings, creating or editing a signature, and saving your changes. By following the detailed steps provided for both desktop and mobile versions, you can ensure a professional appearance in all your emails. Experiment with different styles and update your signature regularly to keep it current and reflective of your brand. For creating polished and professional signatures, we recommend using tools like HoneyBook’s email signature generator, which simplifies the process and offers a variety of customization options to suit your needs.
More email signature tips
Once you have your email signature, be sure to add it to all of your client communication. That way, you’re presenting your consistent brand and company information to everyone you communicate with, whether that includes leads, clients, and vendors.
Set your email signature in your Gmail account. Or, better yet, consider enhancing your client communication with a platform like HoneyBook. With a HoneyBook account, you can set your email signature plus create email templates that make it much easier to communicate. Beyond that, you can save even more time with HoneyBook AI, which crafts email responses for you while maintaining your brand voice and tone.
How do I add a handwritten signature in Gmail?
To add a handwritten signature, first, write your signature on paper and scan it. Save the scanned image as a PNG or JPEG file. Then, follow the steps to add an image to your Gmail signature. Use HoneyBook’s email signature generator to create and customize your signature effortlessly.
How do I add a different signature in Gmail?
In Gmail settings, navigate to the “Signature” section under the “General” tab. Click “+ Create new” to add a different signature. You can manage multiple signatures and switch between them as needed. HoneyBook’s email signature generator can help you create diverse and professional signatures.
Why is my Gmail signature not showing up?
Common issues include not saving changes, signature placement settings (new emails vs. replies/forwards), and email client restrictions. Ensure your settings are correct and that your signature is enabled for all email types.
How to create a new Gmail signature?
Go to Gmail settings, find the “Signature” section in the “General” tab, and click “+ Create new.” Enter your desired signature text and formatting, then save changes. HoneyBook’s email signature generator offers an easy way to create and customize your new signature in minutes.
How do I add an image to my Gmail signature?
In Gmail settings, go to the “Signature” section, place the cursor where you want the image, and click the “Insert Image” icon. Upload your image or use a URL. Save changes to apply.
How to make Gmail signature default?
In Gmail settings, under the “Signature” section, select your signature from the dropdown menus for “For new emails use” and “On reply/forward use.” Save changes to set it as the default. HoneyBook’s email signature generator helps create and manage your default signature effectively.
Maintain greater professionalism in your communications and beyond with HoneyBook
HoneyBook is a comprehensive clientflow business management platform designed for independent businesses. We offer a wide range of tools to streamline your operations, from project management and client communication to invoicing and payment processing. With HoneyBook, you can create and send professional proposals, contracts, and invoices, making it easy to manage client relationships and secure new business.
Our platform also provides automation tools that handle repetitive tasks like follow-up emails and appointment scheduling, allowing you to focus on growing your business. By integrating these features, HoneyBook helps improve overall efficiency and productivity, ensuring you can manage your business with ease and professionalism.

Ensure consistent communication
Use HoneyBook to manage all of your client communication in one place.
Get started
Megan Martin is a writer, speaker, graphic designer and photo stylist at Megan Martin Creative, a design & lifestyle studio producing relevant educational and inspiring content for creatives and mompreneurs. She is on a mission to encourage and equip creative women with tools and community to do business well after serving over 5 years as a wedding planner and brand designer. When she's not running her creative business or traveling to conferences, you can find Megan living out her biggest dream of a joyful life with her husband Jeremy and two little girls, Kennedy and Esley in sunny Florida!