

How to add the HoneyBook client portal to your website
Start a Trial

Learn how to embed the HoneyBook client portal onto your website so you can wow your clients with a seamless client experience.
An excellent clientflow is all about keeping your clients in the loop and communicating effectively throughout a project, which you can accomplish through a client portal.
With HoneyBook’s client portal software, you can provide one simple project work space for your clients to access files, messages, payments, and meetings.
This helps you stay organized as a business owner and gives your clients a smooth project experience from start to finish—all while showcasing your unique brand.
Adding your HoneyBook client portal to your website is easy, whether it’s built on Squarespace, Wix, WordPress, or any other platform – and it’s one of the best project management tools available to you today.

Keep clients happy
Simplify communication and maintain better relationships by centralizing all client interactions with HoneyBook.
Get startedThe benefits of an integrated HoneyBook client portal
Above all, your HoneyBook client portal gives you one space to organize project progress, track statuses, and communicate with clients. It keeps you both on the same page and makes work easier with less back and forth.
By following the steps below, the end result will be an on-brand client portal that’s easily accessible through a link on your website.
This creates a cohesive experience for both you and your clients in several ways:
- Staying organized: The HoneyBook client portal acts as one easily accessible hub where both you and your clients can track activity history, files, payments, project timelines, and job details in one place.
- Creating a white-labeled experience: By customizing your client portal URL and login screen to match your brand, your client portal will feel like an authentic extension of your business.
- Keeping everything documented: The HoneyBook client portal makes it easy to reference any and all versions of files shared between you and your clients. That means contracts, project scopes, business email threads, and upcoming payment due dates can be accessed in only a few clicks from your website. That way, no client communication will ever be lost, and you can avoid difficult situations with clients.
- Added security: The HoneyBookclient portal is built to protect the information shared between you and your clients, making it a more secure option than exchanging sensitive communication over email or chat.
- Capturing communication in one place: Even when clients respond to HoneyBook emails with their own email, everything will be pulled into one central communication feed within the client portal.

You can decide whether your clients need to log in to access their client portal, giving you the ability to decide what level of security makes the most sense for your business.
Three simple steps to integrate HoneyBook with your website
You can integrate your HoneyBook client portal with your website in three simple steps:
- Create a custom client portal URL using your website domain
- Customize the client portal with your company’s branding
- Integrate your HoneyBook client portal with your website

Here’s how to make it happen:
1. Customize your client portal URL
You have two options when it comes to creating a URL for your HoneyBook client portal: using the HoneyBook domain or your domain.
By default, your client portal will be set to use the HoneyBook domain through an auto-generated URL in the form of prefix.hbportal.co/app, where the prefix can be edited from your Company Settings menu. You can check out this Help Center article to learn how to use the HoneyBook domain.
However, we strongly recommend using your domain. By using your own domain, your client portal URL will be in the form of prefix.yourdomain.com, where the prefix is customizable to anything you want, and yourdomain.com is your existing website URL.
For example, if your website is perfectwebsite.com, you could set your client portal URL to project.perfectwebsite.com.
Why is it so important to use your own domain?
Using your brand everywhere you can is the easiest way to ensure a consistent experience for your clients. The more touch points your clients have with your brand, the more they will come to associate your brand with trustworthiness, professionalism, and reliability.
By using your own domain for your client portal, your clients will feel like they never left your site, as the URL still stays true to your branding.
How to customize your HoneyBook client portal URL
- From HoneyBook, click your profile photo. Select Company Settings > Domain & client portal
- In the URL field, click the “Use Company Subdomain” button
- Register your subdomain with HoneyBook by entering your domain name, choosing your subdomain, and creating the subdomain with your website host by creating your CName record name
The last step is the most involved. Every domain host has their own unique instructions, whether it’s WordPress, Squarespace, Wix, GoDaddy, or other providers.
For full instructions on how to register your custom subdomain, check out this Help Center article on using custom domains with HoneyBook.
2. Customize your login screen branding
To add to your clients’ feeling that they never left your website, you can customize your HoneyBook client portal login screen to match your company’s branding.
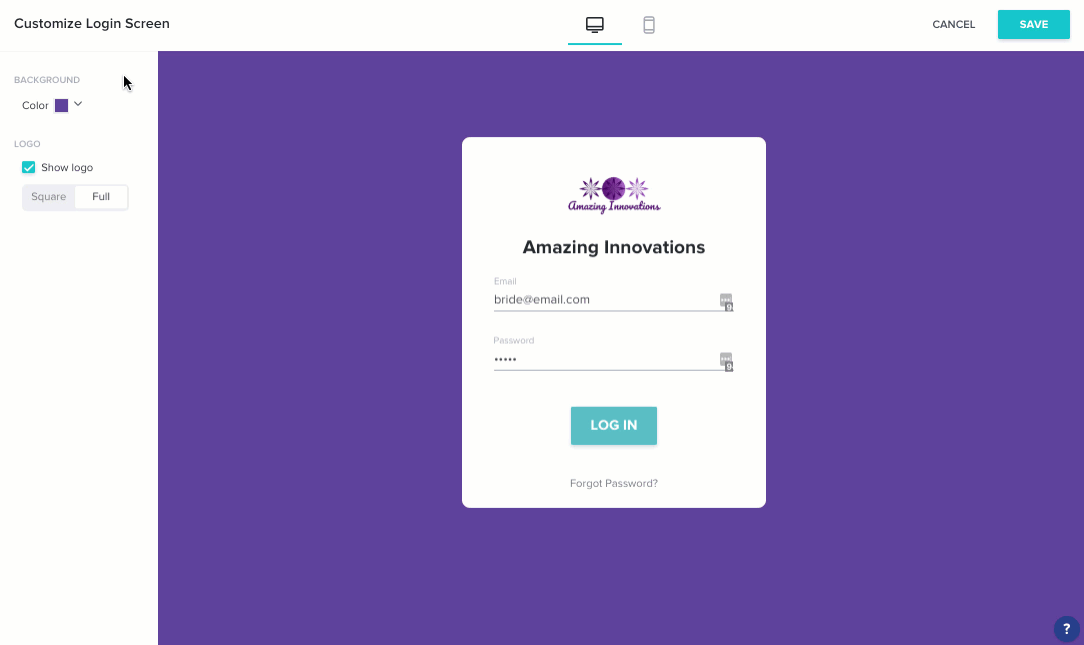
To do so, visit your Company Settings from HoneyBook and click the Domain & client portal tab. Then, click Customize Screen in the Login Screen Preview section.
From there, you can customize the background color and add your company logo, ensuring a completely beautiful and on-brand experience for your clients.
For detailed instructions on customizing your login screen with your unique branding elements, check out our article on your clients’ client portal experience.
3. Link your client portal from your website
Once you’ve customized your HoneyBook client portal, it’s time to add it to your website.
This is easy! Simply add a link to your website wherever you’d like. This can be in your website’s top navigation, footer, or as a button on a page.
When your clients click the link, they will be taken to the HoneyBook client portal where they will be asked to log in.
While clicking this link technically takes your clients off your website, it will still be on the same domain (if you use your custom domain). Therefore, your clients won’t even notice they’ve left your site.
Leveraging more HoneyBook website integration
HoneyBook is a comprehensive clientflow management platform, which means it helps with the entire process of selling and delivering your services.
Your clientflow always starts with capturing leads, and HoneyBook enables you to do so with a contact form that you can embed anywhere on your website (or share as a link). From there, you can send automated emails and use your client portal to manage communications. With these integrations, HoneyBook allows you to manage more of your business without as many software or tools.
The more connections you create between HoneyBook and your website, the more cohesive experience you’ll provide to leads and clients.

Everything in one place
Easily keep track of all your clients and projects using HoneyBook.
Get started
Mac Hughes is a business management software pro and notorious fashionista among friends and coworkers alike. She has worked alongside the tech geniuses at MINDBODY and HoneyBook helping business owners adopt processes for streamlining their passions. When she’s not busy helping service based businesses reach peak efficiency, you can probably find her crafting some home brew in the garage.


.png)