
How to use HoneyBook automations to reduce workload and elevate your client experience
Start a Trial

Get started with HoneyBook automations to take repetitive work off of your plate and create scalable processes throughout your clientflow.
One of the biggest benefits of using HoneyBook is that you can manage all of your business processes in one place. That includes capturing and managing leads, selling your services, booking clients, communicating, and more.
HoneyBook offers features to manage each step of your clientflow. Even better? The platform also has automations that enable you to tie each step in your process together to save time.
With HoneyBook automations, you can reduce your workload, stay organized, and work more efficiently so that it’s easier to scale your business. Automations also ensure that your clients are given a consistent and smooth experience.
Explore more about HoneyBook automations:
Reduce manual, repetitive admin work
How much of your workload includes doing the same tasks over and over again? As you scale your business, there are more repetitive tasks to do. Since it’s a growing pain, it’s a great indication of business success, but it is still a pain. You might notice that repetitive tasks make up the majority of your work, while you have less time for strategy, creative thought, and planning.
This is where HoneyBook automations can come in to help take that work off your plate. With more consistent processes and time to focus on goals, it’s easier to grow and scale your business.
Consider some of the tasks that you complete with every client.
How to use HoneyBook automations for admin tasks:
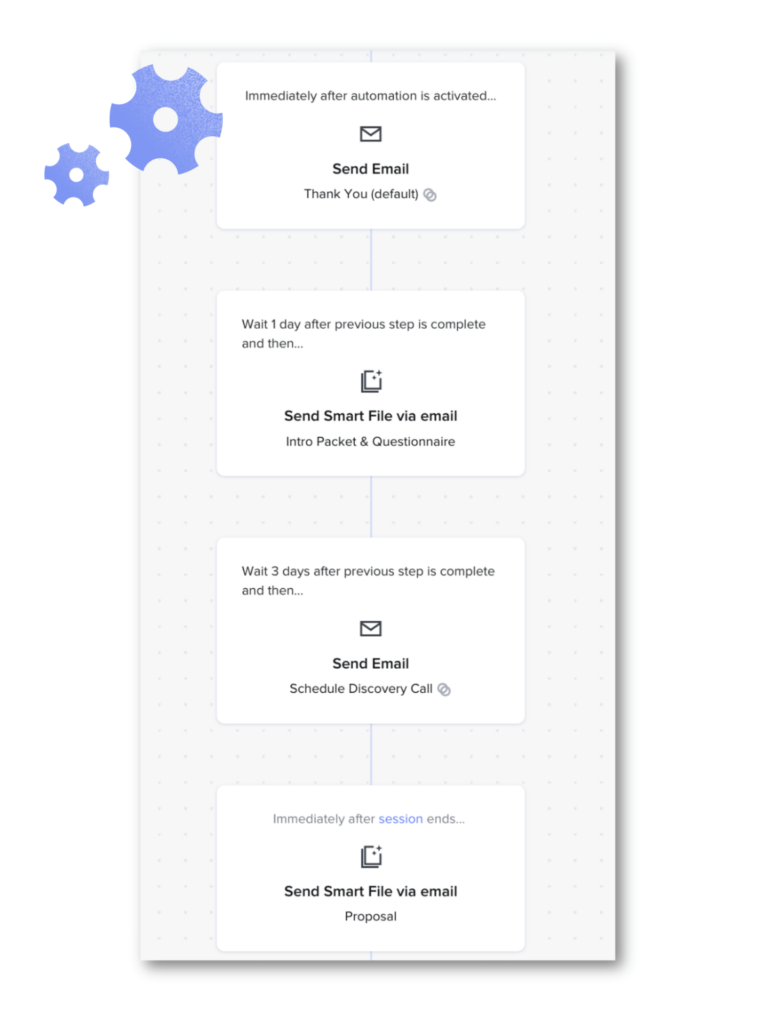
- Pre/post meeting tasks – Add an automation to any HoneyBook lead form to schedule with clients then follow up automatically. Send your agenda or other files, like an info-gathering questionnaire, before a meeting or session. After the session, you can also trigger an automation to send a recap email that includes next steps.
- Scheduling – Automate an email that includes your meeting scheduler so that you can get time on the calendar with clients, whether you schedule after they inquire, book, or any other action.
- Booking – Immediately send a booking file when you know your client is ready. You can send an individual contract followed by an invoice, or combine them all together in one file. Automate the process as soon as someone inquires or when another action is complete, like filling out a questionnaire.


For easy setup, build your email and file templates first so that it’s simple to create the automation and immediately add the content you need. For instance, create a general thank you email template and then apply it to any new automation.
Speed up your sales cycle
When it comes to selling your services, there should be the least amount of friction possible before conversion. With HoneyBook, it’s possible to provide potential clients with all the information they need, qualify them on your end, and book–all in one step!
When capturing leads through HoneyBook, use the lead forms feature to have clients complete some booking steps upfront. Include an intake questionnaire, service selection, invoice, payment, and scheduling all within your form, and link it from any of your public channels.
If you don’t want to include everything up front, you can still use automations to speed up your sales cycle with less manual work.
How to use HoneyBook automations in your sales process:
- Thank you emails – Start with the basics and automate a thank you email every time someone inquires with you.
- Follow-up – Set an automated task reminder to follow up with a client a few days after their inquiry. By doing so, you can ensure you’re following through with inquiries in a timely manner.
- Lead qualification – Qualify your leads in a more private and personalized way. Automate specific questionnaires to clients as soon as they fill out your contact form—you can tailor these to the services they’re interested in by asking that question in your contact form. Though you can include questions in your HoneyBook contact form or lead form, this helps you dive deeper with new leads to understand if there’s a good fit.
- Discovery – Automate an email that includes your scheduler so you can immediately schedule a discovery call when someone inquires.
- Service selection – Take it a step further and automate a more robust sales brochure that includes an intake questionnaire and service selection—you may want to automate this right after you’ve received their inquiry or wait until you’ve completed a discovery call and have more information.
- Booking – If you don’t want to offer instant booking via a lead form, you can wait until you receive an inquiry, then automate an all-in-one booking file to send to your client.
Elevate your client experience for better, longer-lasting relationships
Put yourself in your client’s shoes. If you’re receiving inconsistent replies, waiting a long time to get a response, and not sure where your project stands, it can be really frustrating.
Of course, everyone gets busy, but that’s why automations can help you make sure no communications slip through the cracks. With some simple setup, you can ensure you’re providing a standardized experience for every client.
How to use HoneyBook automations within your client communication:
- Thank you emails – Automate thank you emails when leads or inquiries reach out so you’re the first business getting back to them.
- Confirmations – Automate confirmation emails after actions like scheduling a call, booking, and paying an invoice. Use canned confirmation emails to make setup easy!
- Check-ins – Automate check-in emails throughout a project so you always provide status updates to your clients.
The beauty of HoneyBook automations is that they’re customizable to your needs. You can build the workflows that make the most sense for individual inquiry forms or specific service offerings.
Plus, you don’t have to sacrifice personalization. You can always set your automations to approve before sending so you have your eyes on every communication that goes out—you just save time without having to write them from scratch.
Keep projects and clients on track
Just like emails can slip through the cracks, different project tasks can as well. You might be juggling multiple clients at the same time or working on long-term projects where it’s easy to forget your own deadlines.
This is where HoneyBook automations can help with project management. Within any automation, you can trigger a notification to remind you or a team member to complete an action at key milestones.
How to use HoneyBook automations for task and project management:
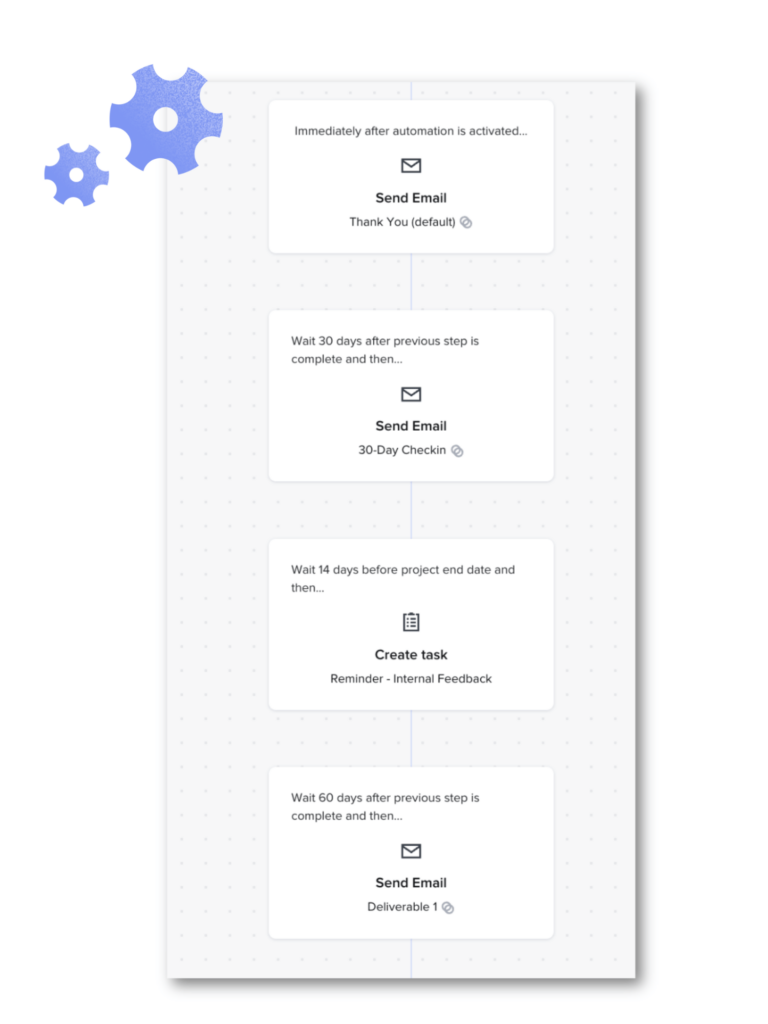
- Due dates – When your contract is signed and your project officially kicks off, you can schedule reminders for due dates you’ve promised your clients and ensure you never miss a deliverable.
- Task reminders – Automate task reminders so you know when it’s time to set up a call, check something off your to-do list, or reach out manually to your clients.
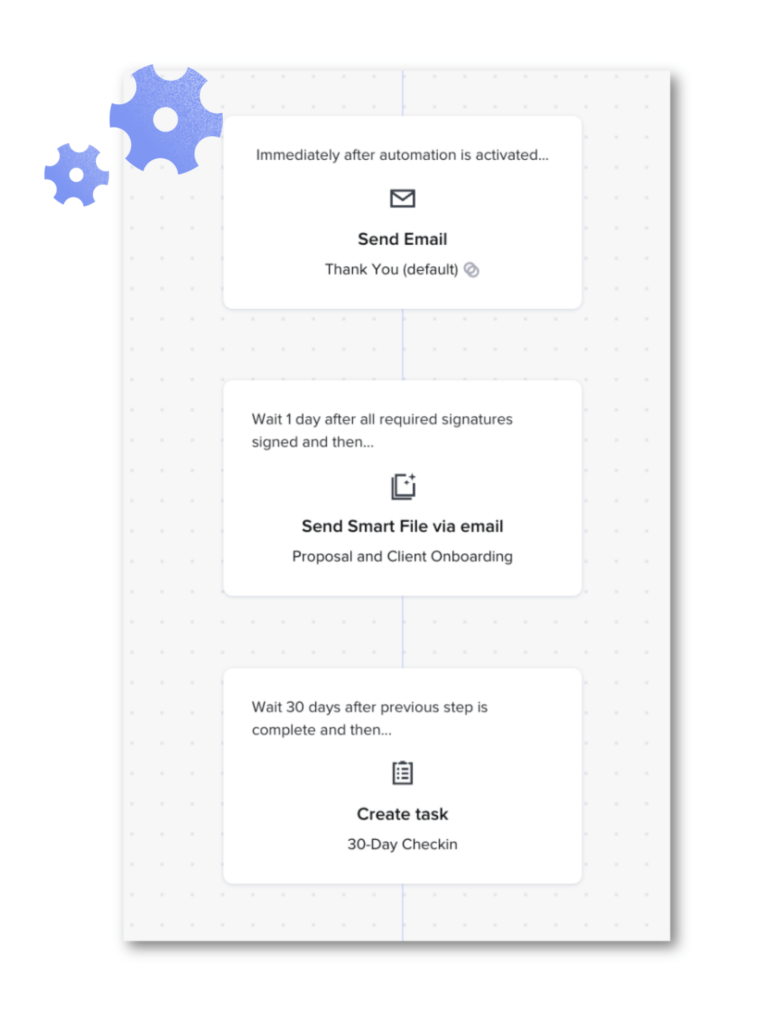
- Onboarding – Automate your onboarding experience by sending a welcome packet as soon as your client signs and pays.
- Offboarding – Automate your offboarding experience by sending a project closure file that includes a project summary, a request for testimonial, or details about your referral program (if relevant).
If you’re working with team members, you can manually assign tasks over to another team member at any time.
HoneyBook automations FAQ
Still curious how it all works? We’ve answered some of your most common questions.
How do I get started with HoneyBook automations?
To make the setup process as simple as possible, consider using workflow mapping to understand the different steps you already use. There’s no limit to the number of steps you can add in an automation, so it’s easy to translate your process into the builder.
Once you know which steps you want to automate, set up the HoneyBook file templates and email templates that you know you’ll need in your automations, like your thank you emails, invoices, contracts, welcome packets, and more.
To trigger your automations to start, you can either activate them via a lead form or contact form, or manually apply them to a project. By activating through a lead form or contact form, you can start from the moment you receive an inquiry.
What triggers are available in HoneyBook automations?
In HoneyBook, you can use these triggers and any timeline of minutes, hours, days, and weeks to set up your automation:
- After automation is activated (Someone inquires through a lead form or contact connected to the automation, or the automation is manually applied to the project.)
- After project date
- After project end date
- After project is completed
- After contract is signed
- After questionnaire is completed
- After smart file is completed
- After all signatures are signed
- After first payment
- After invoice paid in full
- After session is scheduled
- After sessions starts
- After sessions ends
- Before project date
- Before project end date
- Before session starts
- Before session ends
Can you segment your automations for different types of leads and clients?
Yes, you can use HoneyBook automations to create a sequence of actions with your specific types of leads and clients.
With leads who inquire through your contact form, just be sure you ask your clients what type of service or project they’re interested in. If you include this question, you can create an automation associated with each project type you offer. Then when that project type is selected, it’ll trigger the unique automation you’ve built.
With lead forms, you can segment by each form and create a unique automation for each one. For instance, you may have a lead form you link to your social profiles that has a specific automation, vs. a lead form you link from your website.
You can also build automations specific to the clients you’re already working with. Just build the automation you need, then apply it to that project.
Start automating key steps in your clientflow
Ready to save time and improve your client experience? Get started with HoneyBook automations and translate your workflows into a streamlined process that takes work off of your plate.
More time for fun
Automate your repetitive tasks and admin work with HoneyBook automations.
Get started
HoneyBook's client relationships platform makes it easy for independent business owners to streamline their processes and create remarkable client experiences by combining essential tasks like an online contract, online invoice, client communication, online payment software, and more all in one place.


.png)