

How to create an invoice for small businesses and creatives
Start a Trial

From independent consultants to global corporations, every team relies on consistent invoicing to keep the lights on. It’s probably not the highlight of your day—especially if your plate is already full—but a missing or messy invoice is the fastest way to stall your cash flow.
To make sure you get paid on time, your billing process needs to be professional, precise, and perfectly timed. Here’s everything you need to know to master the process, from how to create an invoice to the must-have line items that will get you paid.
What is an invoice, and why is it so important?
An invoice is more than a bill—it’s a formal request for payment that itemizes your value. For service-based businesses, intentional invoice preparation is your most vital professional touchpoint after the initial contract.
When you prioritize clarity in your billing, you do more than just record finances; you set clear payment expectations. Transparent, well-structured invoices act as trust-builders, ensuring clients understand exactly what they’re paying for while securing your cash flow through a predictable schedule.
How to create an invoice: Key elements for faster payments
A well-prepared invoice document removes the friction between “bill received” and “payment sent.” To set your clients up for success, every document you issue should clearly feature the following details.
1. Business name
Your business name is the anchor of your identity. If you’re unregistered, use the legal name associated with your bank account or your registered “Doing Business As” (DBA) name to make sure payment processing happens without a hitch.
2. Your business contact information
This is where you include your business contact information, including phone number, website, and email address. Including a physical address is often a legal or tax requirement for formal business records, while social media handles offer an extra layer of brand verification.
3. Invoice number and date
Using a business management platform like HoneyBook automates the process of numbering invoices. If you’re creating your own invoices without help from a tool, you’ll need to create an official numbering system. One way to do this is to use sequential systems (1, 2, 3, and so on). To make it more precise, you can also use the date you plan to send the invoice.
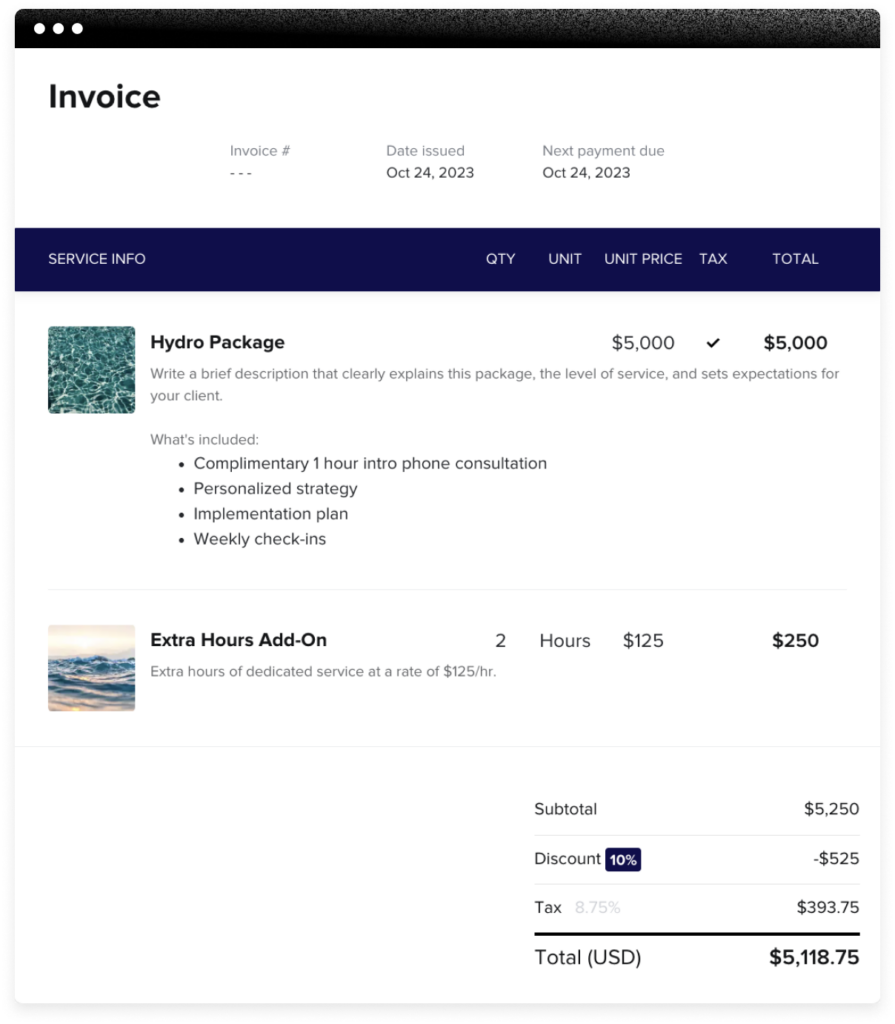
4. Detailed line items
List each service or product as a separate line item to provide a transparent “paper trail” of the project’s value. By clearly labeling each charge, you set a professional standard that makes it easy for the client to cross-reference the invoice against your original contract or statement of work.
5. Total cost
The final balance should be the most prominent element on the page. Use a clear visual hierarchy—such as bold formatting or a dedicated total block—to ensure the amount is identifiable at a glance.
6. Payment terms
Specify when the client is expected to make the payment, such as “Payment due within 30 days of invoice date.” For transparency, also include late payment fees or interest rates.

Try designing an invoice with HoneyBook’s free invoice generator and see how easy and fun it can be to create a professional-looking invoice design in no time.
7. Billing milestone or phase
Each invoice should clearly state which part of your payment it covers, whether it’s the initial deposit, a project milestone, or the final balance. Referencing the specific phase defined in your contract ensures the client’s accounting team can quickly match the invoice to your agreed-upon terms.
8. Client contact info (Bill To)
Address the invoice to the specific person or department responsible for making the payment. Including the correct legal entity name and a direct contact email ensures the invoice reaches the right desk and meets the client’s internal filing requirements.
9. Payment instructions
To minimize friction, use online billing forms that allow clients to settle their balance with a single click. If you prefer manual methods like ACH or bank transfers, list those details clearly. By integrating your payment instructions directly into the invoice, you eliminate the need for back-and-forth emails and ensure funds get routed correctly.
10. Terms and conditions
When in doubt, err on the side of caution. Add a terms and conditions section where you explain the terms and conditions of your service, return and cancellation policies, and the penalty for overdue invoices or late payments.
11. Company logo
Your logo is a visual shorthand for your professional reputation. Including it on every invoice makes your document instantly recognizable to the client, reinforcing your brand identity while distinguishing your bill from generic paperwork.
12. Discounts and tax
If you offer discounts or if you’re legally required to impose a sales or services tax, add a separate section that clearly identifies the amount.
13. Seller notes
For any details extending beyond the must-haves, create a “Notes” section to communicate that information. This is also a good spot to say “thank you” to your clients.
Create a professional invoice for free.
Customize, download, and send a professional custom invoice in minutes.
Create an invoiceInvoice templates for small businesses
Now that you have a good grasp of how to create an invoice, it’s time to make your own using an invoice template or online generator (HoneyBook offers both!).
HoneyBook invoice templates are especially useful for:
- Consultants
- Event planners
- Caterers
- Graphic designers
- Photographers
Streamline your invoicing process for faster payments
An invoice should be accurate, consistent, and clear. What it should not be is a unique design project or time-consuming chore. Your clients care more about finding the same information in the same place every time than they do about elaborate layouts. Consistency makes invoices easier to review, approve, and pay.
To reduce administrative work and accelerate your cash flow, focus on these two areas:
- Leveraging automation: Use invoicing software like HoneyBook to create an invoice online and automate recurring billing. Centralizing your invoicing and client communication prevents manual bottlenecks and frees up time for billable work.
- Standardize delivery: Send electronic invoices and use digital signatures to formalize approvals. This creates a digital paper trail that makes storing, retrieving, and tracking payments significantly faster.
How to send an invoice
Once your template is ready, choose a delivery method that aligns with your client’s internal processes:
- Email: Directly send invoices to your client’s inbox by converting them to PDF.
- Print and mail: While less efficient than digital delivery, physical copies are sometimes required by government agencies or legacy corporate accounting departments.
- Invoicing software: These tools allow you to design, fill out, and send invoices.
- Online payment portals: Online invoicing platforms like Stripe, PayPal, Payoneer, and Wise also let you request and collect payments.

Manage multiple projects with integrated invoicing
For independent professionals, the challenge isn’t just winning clients—it’s managing the admin load that follows. When you’re juggling several projects simultaneously, playing “part-time accountant” can distract from your billable work and delay your revenue.
To stay organized and scale your portfolio, prioritize creating invoices online through an integrated clientflow platform like HoneyBook. Instead of treating billing as a disconnected chore, you can:
- Automate the entire journey: Link your invoices directly to your contracts and project milestones to ensure payment triggers are never missed.
- Centralize your records: Manage everything from onboarding to final payment in one place, keeping every billable hour and expense from slipping through the cracks.
- Accelerate cash flow: Send professional, automated invoices that allow clients to pay instantly, turning a manual process into a seamless digital experience.
Get paid faster with HoneyBook
The most practical way to build long-term trust and get paid on time is managing your entire workflow—from lead capture to invoicing to the final “thank you”—in one place.
With HoneyBook, you can create professional invoices, automate payment reminders, and stay organized, even as you build a bigger client portfolio.
Ready to streamline your billing? Try HoneyBook for free today.

Offer seamless payments
Offer multiple payment options with HoneyBook and get paid directly through your invoices.
Get startedFAQs
What’s the difference between an invoice and a bill?
While the terms are often used interchangeably, the difference between invoices and bills lies in the expectation. A bill is typically a record of a simple transaction requiring immediate payment (like a utility bill). An invoice is a professional business document that outlines a credit relationship, providing a detailed breakdown of services rendered and specific terms for when and how payment should be made.
What invalidates an invoice?
An invoice can be invalidated if it’s missing required details such as business information, an invoice number, dates, itemized services, or accurate totals. Errors in pricing, taxes, or client information can also delay payment or lead to future disputes, depending on local regulations.
Related Post
8 invoice examples to bill your clients


Sam Cook is an experienced freelancer writer and former high school English and journalism teacher. He enjoys geek culture and chicory coffee.