

How to send an invoice: A step-by-step guide for small businesses
Start a Trial

Learn how to send an invoice in 7 simple steps. We walk you through creating the invoice, sending it online, and getting paid! We’ll also show you how to send invoices as quickly as possible to get paid faster.
Ask and you shall receive. Well, not always. When it comes to getting paid as an independent business owner, first you need to know how to send an invoice. Sending an invoice is a concise, professional way to ask to get paid.
Not just any document will do – you need to make sure your invoice is organized, easy to understand, and contains specific information. The message you send with the invoice also matters just as much so you can remind clients of your payment schedule and expectations.
We’ve worked with thousands of small businesses to perfect the art of sending an invoice. Here it is in seven simple steps to get you paid—fast.
How to send an invoice in 8 easy steps
Sending an invoice can seem daunting, but it doesn’t have to be. Our step-by-step guide simplifies the process, making it easy and efficient. Below is an overview of the key steps to get you started:
- Determine your payment terms
- Create the payment schedule
- Include the right information
- Use a professional invoice template
- Choose the best invoicing process
- Send an invoice email
- Accept online payments
- Track your invoices
- Send payment reminders
By following these steps, you’ll create a seamless invoicing process that ensures timely payments and fosters strong professional relationships. Next, let’s explore each step in detail.
1. Determine your payment terms
One size doesn’t fit all, and the first step is to determine your payment terms. This means making choices about how you bill your clients. Your billing approach can vary depending on the nature of your work, project duration, and client preferences.
Here are a few options to consider:
- Upfront payment or retainer: Consider requesting an upfront payment or retainer fee before starting any work. This approach ensures you have a financial commitment from the client. It’s particularly useful for securing your services for longer-term projects.
- Installments based on dates: Break down the project’s total cost into installments based on specific dates you set. For instance, you might request 50% upfront, 25% one month before project completion, and the remaining 25% upon project completion.
- Installments based on milestones: If your project involves distinct phases or milestones, you can bill clients at each milestone’s completion. For example, bill 25% after completing phase 1, another 25% after phase 2, and so on.
- Hourly billing: If you offer services on an hourly basis, consider billing your clients weekly or bi-monthly.
The key is to align your billing method with your business model and your client’s preferences. Clear communication and a well-defined payment schedule will help streamline the invoicing process and foster a positive client relationship.
2. Create the payment schedule
The first step in sending invoices is knowing when to send them. We swear by the best practice of not starting work until you receive an upfront payment in the form of a deposit or retainer. Something to consider if you don’t already require one.
In this case, send the invoice for the deposit immediately after your client agrees to work with you. This can be after they accept your proposal or sign your online contract. Once you receive the deposit, you can get straight to work.
With HoneyBook invoices, you can automate the invoice to send automatically once the contract is signed. No more waiting for the notification that the contract is ready, then logging into your account to send—you can make it send immediately with payment reminders.
After this initial invoice, determine the best way to send invoices in the future.
Common invoicing schedules include:
- Installments based on dates you assign (e.g., 50% due up front, 25% due one month before the project completion, 25% due at project completion)
- Installments based on project milestones you decide (e.g., 25% due after phase 1, 25% due after phase 2, 25% after phase 3, etc.)
- Weekly or bi-monthly (twice a month) if you’re billing hourly
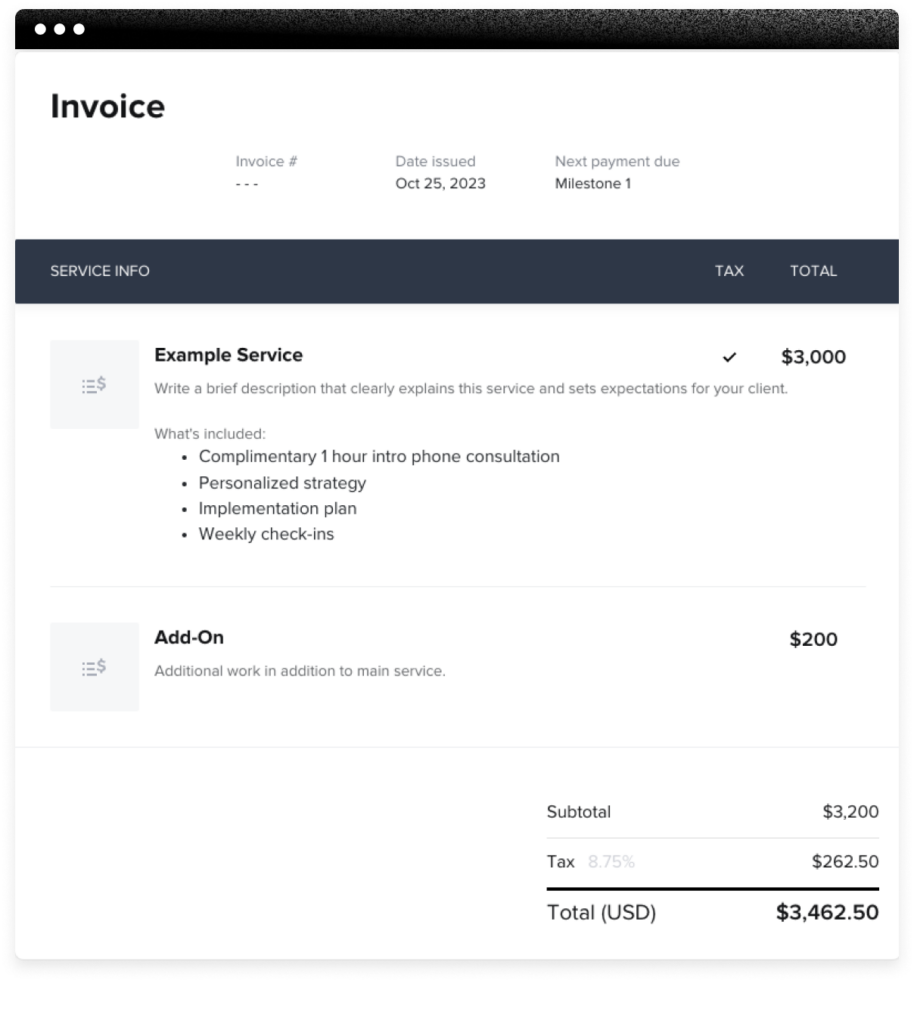
3. Include the right information
Invoices have one job: getting you paid. If you’re wondering how to make an invoice for a payment, focus on including all the necessary information rather than making it sound clever or cute. It’s more important that the information is all there and presented in a straightforward way so that your clients have everything they need to pay you.
What to include in an invoice:
- Invoice title: Calling it what it is right at the top of the document makes it clear to your client that you’re asking for payment.
- Invoice number: Stay organized by using invoice numbers as a point of reference to make sure you and your client are talking about the same invoice. They also ensure each invoice is unique and can be associated with a specific invoice payment.
- Contact information: Ensure your invoice displays your business address, phone number, email address, and any other vital contact information.
- Bill from: Let your client know who the invoice is coming from by adding your details.
- Bill to: Include your client’s name in the “bill to” field so they know the invoice is for them.
- Project details: Add which project the invoice is for and include an itemized list of goods and/or services with corresponding prices.
- Tax: Put in a line for taxes you collect, if applicable.
- Discounts: List any discounts that may apply and deduct this from the total amount due.
- Total amount due: This is the total amount due after you include any taxes and subtract any discounts.
- Due date: Always include the payment due date.
- Acceptable forms of payment: Let your client know how they can pay you (more on this in step 5).

You can assign each invoice its own number (just keep track of them so you don’t use the same number twice) or use invoicing software like HoneyBook to auto-generate new invoice numbers.
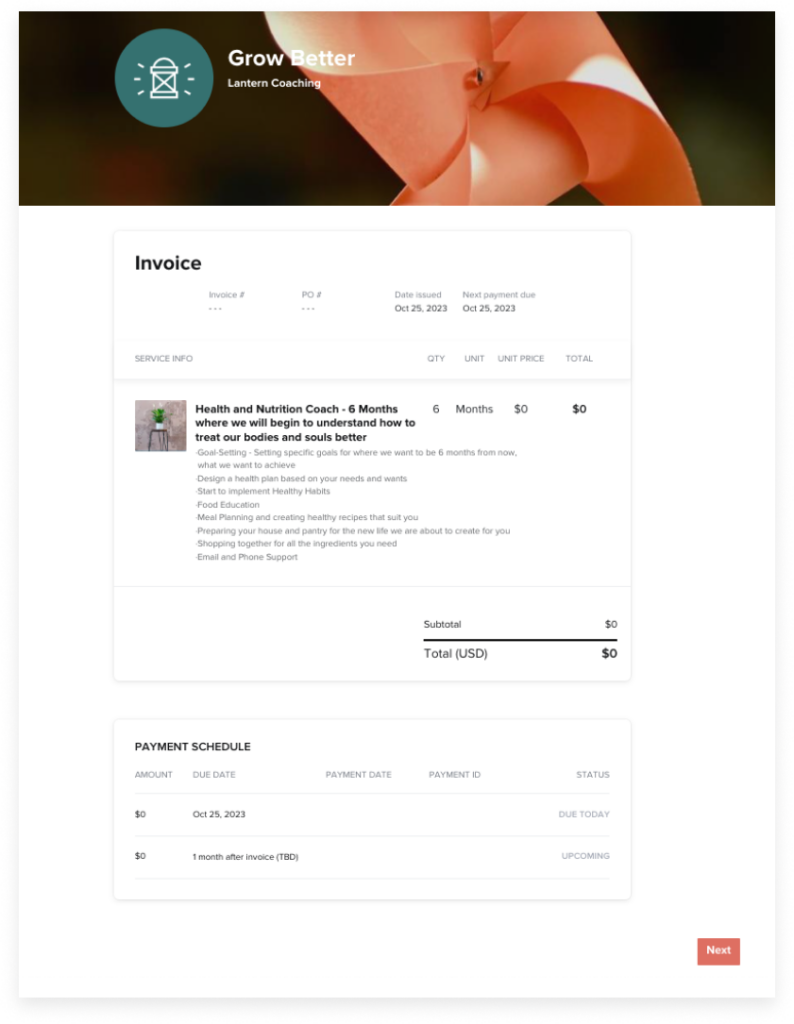
4. Use a professional invoice template
Save time and make it easy to repeat your invoicing process week after week by using business invoice templates instead of starting from scratch every time. Templates make it easy to remember all the fields you need to include and help you look professional.
Instead of the time-consuming process of creating a new invoice every time you need one, all you’ll need to do is update your base template with the specific client, project, and business details. HoneyBook allows you to do this with smart file templates—you can pull information from your client’s contract or a questionnaire so their contact information and services show up automatically.
HoneyBook invoices allow you to go from template, to custom invoice, to getting paid, in one seamless online experience.


5. Choose the best invoicing process
There are multiple methods to write an invoice and collect payment from your clients. The choice you make impacts the efficiency and convenience of the payment process for your clients, so consider your invoice options carefully.
- Email Invoicing: Sending invoices via email is a common and straightforward method. You can attach a PDF or use an invoicing template in the body of your emails. While this approach is easy and familiar, though, it lacks some of the automation features found in dedicated invoicing software.
- Invoicing Software: Using specialized invoicing software streamlines the invoicing process. Different platforms offer customizable templates, automated reminders, and secure payment processing. They also provide tracking features, allowing you to monitor the status of your invoices.
- Accounting Software: If you already use accounting software like QuickBooks, you can generate invoices directly from your accounting platform. This seamless integration ensures that your financial records are up-to-date and accurate.
Invoicing software options
There are plenty of options for invoicing software, and it’s essential to choose a solution that aligns with your business needs. Here are some of the best options to consider:
- Cash App: Cash App simplifies payment collection by allowing clients to pay directly from your invoice. It’s a user-friendly option for small businesses looking for a seamless payment experience.
- PayPal: PayPal is a widely recognized and trusted payment platform. It offers invoicing tools, making it convenient for clients to pay online. However, it may come with higher processing fees compared to other options.
- HoneyBook: HoneyBook offers professionally designed invoice templates that can be customized with your branding. It also provides automation features, making it a time-saving choice.
Think of your specific requirements and choose an invoicing software that not only offers invoicing options but also additional services that will streamline your business’s workflow and make your work life easier.
Related Post
How to create an invoice and get paid fast

6. Send an invoice email
How do you send someone an invoice? Each time you send an online invoice, you should pair it with a brief invoice email. In the email subject line, include the name of your company, the name of the project or client, and the invoice number.
In the body of the email, thank your client for their time and collaboration and explain how they can access the invoice (by clicking a link in the email or opening an attachment, etc.) Also, reiterate the due date and payment options.
Before closing out your email, it’s always a good idea to remind clients of their total outstanding balance and pay schedule as well.
Want to know how to write an invoice for email? Use the following email language below to personalize and send to your clients.
7. Accept online payments
The best way to get paid after you’ve sent an invoice is to make it as easy as possible for your client. As of 2020, a majority of people are using digital payment methods, including credit cards and bank transfers.
In fact, according to a study done by HoneyBook in partnership with Visa, 80% of clients prefer using a credit card to pay and 59% prefer debit. This is strong evidence you want easy solutions for taking payment straight from your invoice.
With HoneyBook, your client can pay you directly from the invoice. They receive an email with a link to the invoice where they can review all the invoice details and then pay with a credit/debit card or ACH bank transfer.
You’ll get a notification (cha-ching!) when they’ve paid, and you can also see if the invoice has been opened but hasn’t been paid yet.
If you’re still asking to be paid via PayPal or another payment service, you’re missing out on a better client experience with HoneyBook.
Using an online payment software, you can offer more payment options via email so your clients don’t have to worry about downloading an app or logging in somewhere else.
Why asking for payment with PayPal is a clunky client experience
- When your clients get a paper invoice in the mail or an invoice attachment in their email, that requires them to navigate over to PayPal, enter in your payment details, confirm their payment details, and hit send (all without getting distracted first)
- Additional $10/mo for recurring billing (like subscriptions or monthly retainers)
- Payments are received in your PayPal account; requires 3 to 5 business days, on average, to transfer funds to your bank account
- Adds one more system to manage in your business toolkit
- Payment tracking is separate from the rest of your business management platform
All online payment processors take fees in order to cover the risk of processing a payment. The industry standard is right around 3%. HoneyBook charges 1.5% for ACH bank transfers and as low as 2.9% + 25¢ for credit/debit cards.
8. Track your invoices
With a clientflow management platform like HoneyBook, a huge perk is that you can see who’s viewed your invoice with read receipts. This helps you decide if you should follow up on unpaid invoices (if they’ve opened the invoice) or resend the invoice (in case they never saw it).
Using a system that tracks your invoices will also let you know when they’re past due, meaning it’s time to send a payment reminder email.
Related Post
8 invoice examples to bill your clients

9. Send payment reminders
In order to avoid late payments altogether, be sure to set up due date reminders as soon as you send your first invoice to a client.
With the right system, you can set these payment reminders automatically as recurring emails so they always get sent close to an invoice due date and directly after if payment is late.
Your clients won’t always be writing down their due dates, but 99% of people are checking their email every day, so these reminders are essential to getting paid as quickly as possible. With more consistent payments, you’ll have more consistent cash flow and be able to grow your business with better forecasting and planning.
Best practices for faster payments
Enhancing your invoicing process with HoneyBook can lead to faster payments and improved client relationships. A well-organized invoicing system reduces the time spent on administrative tasks and ensures clarity and professionalism in your transactions. By adopting effective invoicing practices, you can avoid misunderstandings, maintain a steady cash flow, and create a seamless experience for your clients. Here are some valuable tips to help you optimize your invoicing process:
- Be clear and detailed: Clarity in invoices prevents confusion. HoneyBook’s customizable templates ensure you include all necessary details, like due dates and itemized services.
- Set up automated reminders: Automated payment reminders are key to reducing late payments. HoneyBook’s system notifies clients about upcoming or overdue payments.
- Offer multiple payment options: Providing various payment methods encourages prompt payments. HoneyBook supports credit cards, bank transfers, and online platforms.
- Establish consistent invoicing practices: Consistency in invoicing builds predictability. HoneyBook allows you to schedule recurring invoices to maintain regularity.
- Personalize your communication: Personal touches foster positive client relationships. HoneyBook enables you to customize invoice emails with thank-you notes and work summaries.
Send invoices automatically and professionally
The last tip we can offer to master how to send an invoice is to set up business automation. With automation, your invoice process doesn’t have to take seven steps every time, and you can get more time back to focus on your business goals.
Automate your invoices to send to the appropriate client at the right time of their pay schedule, and follow them up with automated payment reminders. Just populate your automation with our invoice templates and email template, and all you need to do is personalize! Yes, you can thank us later.
Are you ready for your invoicing experience to evolve and take on the future? Join the multitude of businesses that have chosen HoneyBook for their invoicing needs. With HoneyBook’s powerful automation tools, personalized templates, and seamless online experience, you can manage client communication, invoice your clients, and collect payments all in one easy-to-use platform.

I'm a HoneyBooker—writing about small businesses, the people who run them, and tips and tricks to help them grow. I also run Quiet Like Horses, helping small business owners become better writers. So you can use your words to grow your business—and make more money.